The Editor
Items
Reminder: Hover your mouse over almost any input, field, selectionbox or button in the Editor to receive tooltips and examples.
Table of contents
The Item Creator
The Item Creator allows you to create a vast number of highly unique and special items. The following Item Types can be made:
- Equippable Items (Armor, Weapons, Accessories)
- Consumable Items (Food, Drink, Potions)
- Usable Items (Gadgets, One-shot weapons, Throwables, Crafting Recipes)
- Miscellaneous (Ingredients, Sellable Clutter, Non-usable Quest Items)
Depending on what type of item you make, the configuration possibilities are a bit different. So in the following sections, we will take a look at a few examples.
Good to know: You can preview your Item in the render window while you edit it. Super helpful!
First you have to create a new Item and assign it a unique ID. Then, there are various parameters that are always present for all item types:
Name
The in-game name of the item.
Sub-Name
A selection of pre-defined values. This appears under the item's name and states what the item is, e.g. One-handed weapon, Two-handed weapon, Potion, Food, Drink, Armor, Usable etc. and under what category it appears in the inventory. This is useful for most items, especially if the item's own name does not clearly state what it is exactly. The Sub-Name is also used to differentiate Shields from Weapons. If 'Shield' is selected, it cannot attack. So, by not selecting 'Shield', you can create Shield-weapons that can attack.
Item-Type
Determines what the item actually does. It can be equippable, consumable, usable or miscellaneous.
Rarity
Determines the color of the item name and how it will be sorted when sorting by rarity.
Essential
When this checkbox is active, the player cannot drop this item to the ground. Solid choice for quest items.
Value
The value of the item in coins. The value is modified in-game by the player's 'Buying Prices'- and 'Selling Prices'-Attributes. Without any modifications to those attributes, players sell for 10% of the set value, and buy for 200% of the set value. So if your item is worth 1000 coins, you can sell it for 100 coins, and have to buy for 2000 coins.
Weight
How much space the item takes up in the inventory. The player group's carrying weight is determined by each player characters Strength.
Portrait
The portrait of your item as it appears when hovered with the mouse. If you want to use a custom texture, make sure to put it into your '...mods/[YourMod]/gfx/item_portrait' folder.
Item Object Texture
How the item will appear when its placed on the Map. Custom textures go into your
'...mods/[YourMod]/gfx/item_object' folder.
Optional Description (if no Effect is assigned)
If the Item has an Effect assigned, the description will be sourced from there. If not, you can set a description here. This is good for miscellaneous items, like ingredients, quest objects or sellable clutter.
Armor (Equippable)
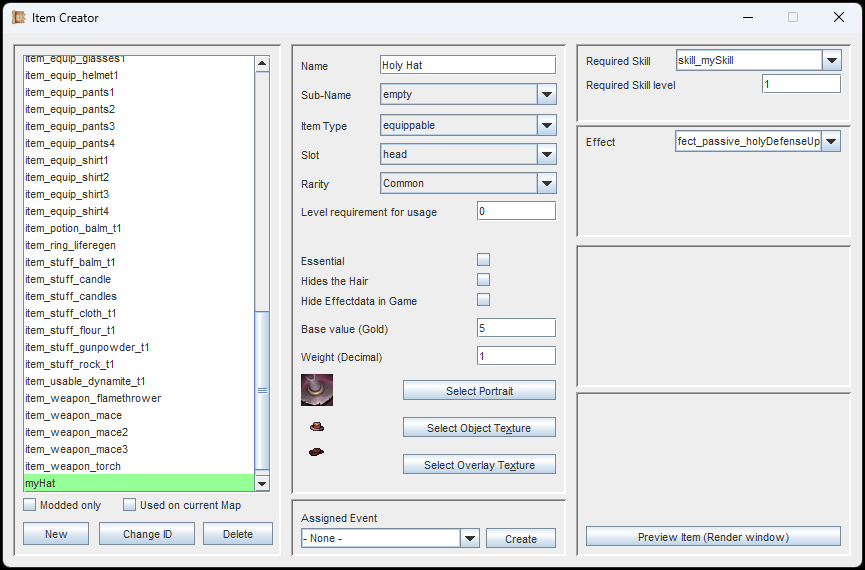
Armor is equippable and goes into any slot besides Onehand and Twohand (because those would make it a weapon)
If the Item Type is set to 'Equippable', you can also select the Slot in which this item will go. This also determines if an item is a weapon (onehand & twohand), or not.
Equippable Items can have a Level Requirement and a
Skill Requirement assigned to them, but this is optional.
Armor items, like e.g. the Hat in the image to the left also require an Overlay Texture which appears on top of the Entity (player/NPC) that equips it. Overlay Texture Sets are placed in the '...mods/[YourMod]/gfx/item_worn' folder.
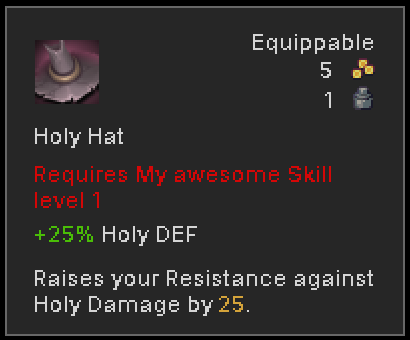
This equippable item goes in the head slot, requires a certain skill, and increases an attribute.
Equippable Items can also have an Effect assigned. For equippable Items it has to be a Passive Effect. In the example image to the left, the Holy Hat has a passive Effect that increases Holy Defense by 25%.
By default, passive attribute changes are displayed as shown in the image. (+25% Holy DEF). However, you can remove this if you select the checkbox 'Hide Effectdata'.
In this example, the passive Effect's description has been updated to also state what it does.
Weapons (Equippable)
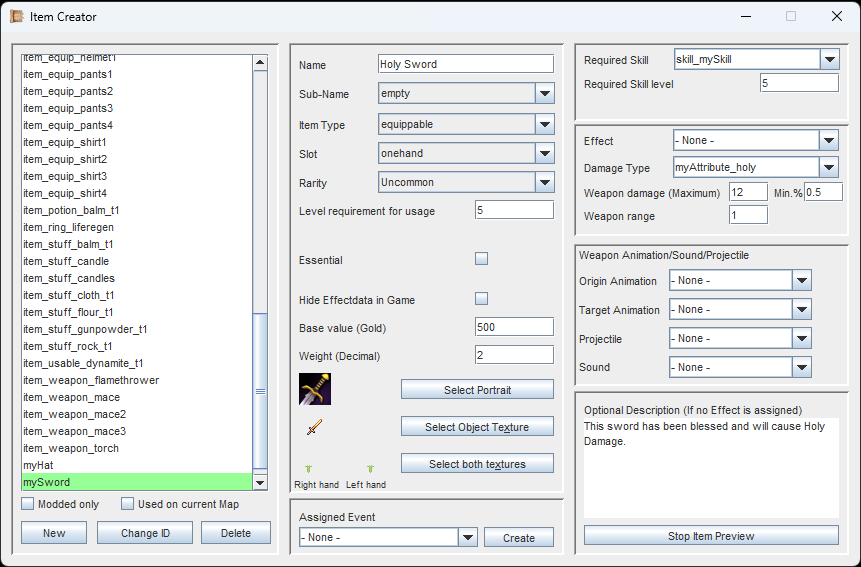
If the Slot is 'Onehand' or 'Twohand' and the Sub-Name is not 'Shield' your Item counts as a weapon.
If you set the Slot of an Equippable Item to onehand or twohand, (and your Sub-Name is not 'Shield') your item counts as a weapon.
The first thing of importance: Weapons have two Overlay Textures. This is because they may be equipped in the Main- or Offhand. Even Two-handed weapons can be used One-handed if you specify an Ability the player must possess to allow for this. So, when selecting the Overlay Textures, you are expected to select two of them, one for each hand.
Like with Armor, you can also set a passive Effect for when the Weapon is equipped.
Now, if you do want to create a Shield, simply select 'Shield' as your Sub-Name. The configuration is exactly the same as with a Weapon, but as long as the Sub-Name is 'Shield' it cannot be used to attack in Combat.
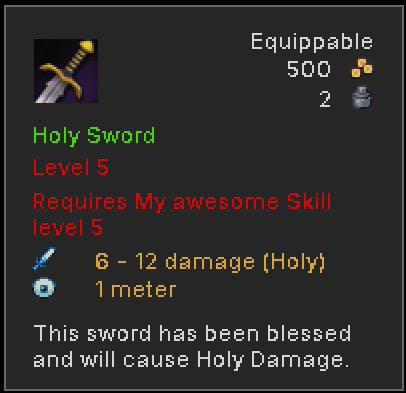
This weapon has no Sub-Name, so it is not clear if it is One- or Twohanded from this info box.
For Weapons a few special parameters are available. Most importantly: The Damage. Here is what's important:
Damage Type
Can be set to Health (Default), Mana, Energy or any other custom Attribute with ATK/DEF-values. When attacking Health, Mana or Energy, the target's 'Physical Defense'-Attribute will reduce the damage. When attacking with an attribute like e.g. 'Fire', then the target's 'Fire Resistance' will reduce the damage and the 'Physical Defense'-Attribute only accounts for 10%.
Weapon Damage & Min. %
The damage range this weapon can do. The first value is the maximum amount. The second value is the minimum percentage. So, '12' and '0.5' equals 6 - 12 damage.
Weapon Range
How far the weapon can reach. Melee weapons usually have 1 tile of range, which means all the tiles around the user. Long-range weapons, like bows and rifles will have bigger values.
Origin- & Target Animation
When the weapon is used, these animations will be played on the attacker and the target respectively. This is optional, but recommended.
Projectile
When a projectile is selected, the weapon will fire that projectile from the attacker towards the target. Once the target is hit, the damage is calculated. Projectiles can be blocked by the environment, e.g. walls.
Sound
Will be played when the weapon is used. Keep in mind that Animations can also contain Sound, so perhaps the Origin- and Target Animations already have everything you need.
Consumables & Potions
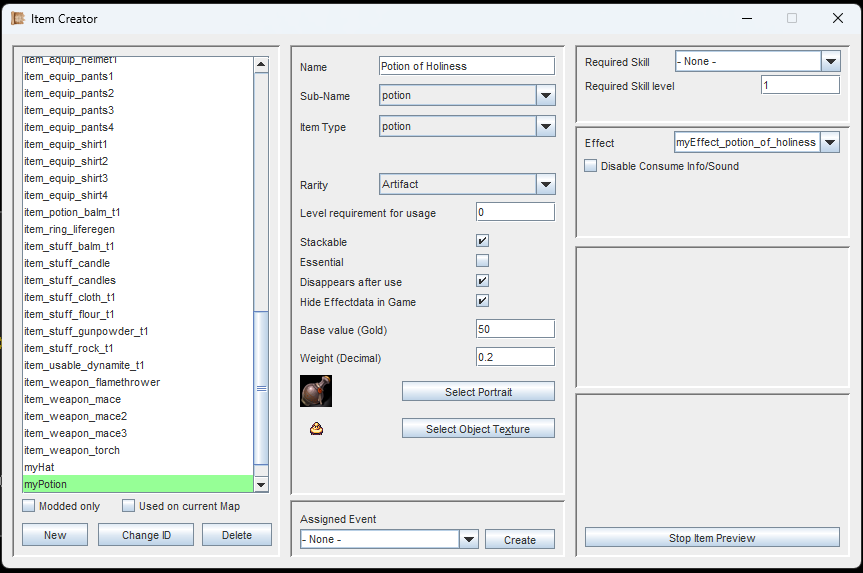
In this example we created a potion with an (active) Effect. Once used, the potion will disappear from the Inventory.
The Item Types 'Potion' and 'Consumable' are mostly the same. They only differ in where they are sorted in the Inventory.
In order for them to do something, they need to have an active Effect. And since they are consumed, it is usually an Effect with the target type 'Self'. More about this in the section below.
Additionally to the normal inputs and checkboxes, there are a few noteworthy things to mention.
Stackable
This determines how it is displayed in the inventory. When stackable, only one single entry is shown, along with the amount.
Disappears after use
True for most Potions and Consumables. Once used, the Item disappears from the Inventory.
Disable Consume Info/Sound
Usually Food, Drink and Potions make a distinct sound when consumed, and the in-game message box displays who has consumed what item. But if you use this checkbox here, no sound plays and no message is shown.
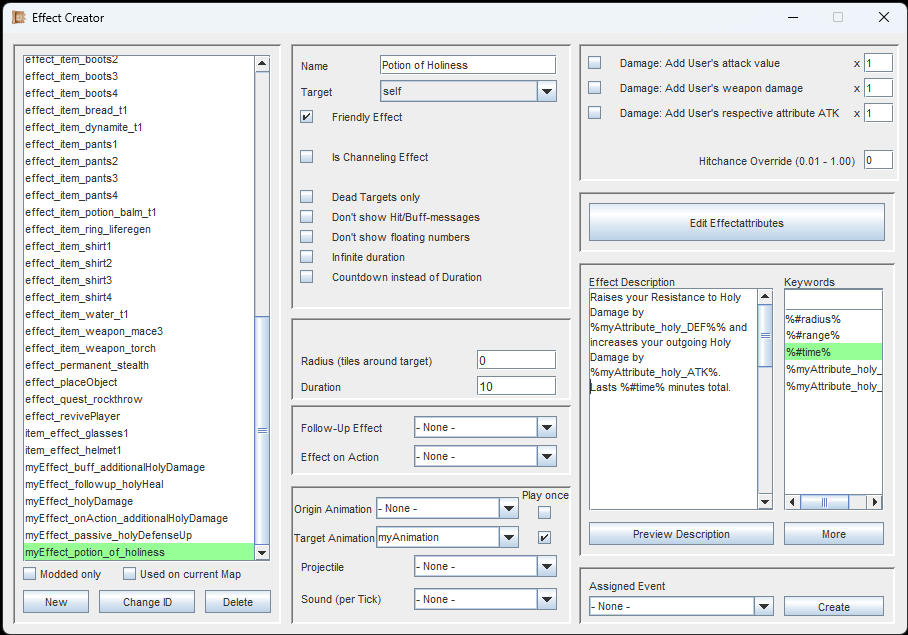
In the Effect-Creator, create an Effect for the Item you are making and format the description as needed.
For the Potion we have created, we need an active Effect. This determines what will happen when the player drinks it. So, we go into the Effect Creator and create a new Effect with an appropriate name that targets 'Self'. The target type 'Self' does not require aiming, it is simply applied to the user.
In this example, we added two Effectattributes: One for increasing Holy Resistance, and one for increasing Holy Damage.
Remember: When an Effect is assigned to an Item, the description will be sourced from the Effect. This way, the description can be precisely formatted, as seen in the image to the left.
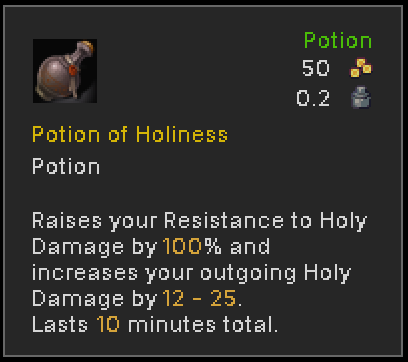
A potion with an Effect that affects the player character who used it.
As before, you can preview your Item from the very beginning and even edit it while previewing.
As you can see in the image to the left, we are not displaying the Effectdata ('Hide Effectdata'), and are instead using the Effect Description to describe what the Item does.
Since the Sub-Name is set as 'Potion' it will be sorted under 'Potions' in the inventory.
Usables / Gadgets
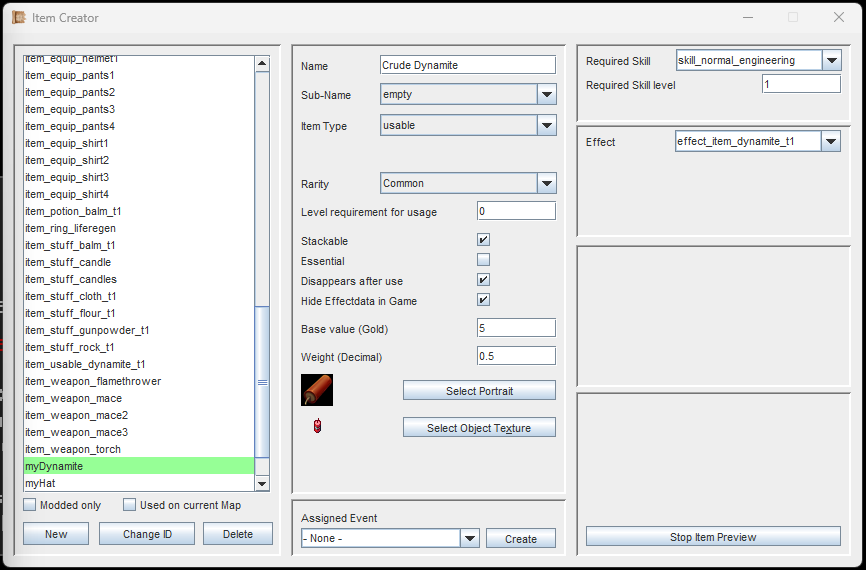
Usable Items can do the same things as Potions/Consumables, but make more sense for certain applications.
Usable Items are configured very similarly to Consumables and Potions. They have their own tab in the inventory and they can have an active Effect attached.
Usable Items can be anything from Dynamite to Single-Use Rocket-powered shoes.
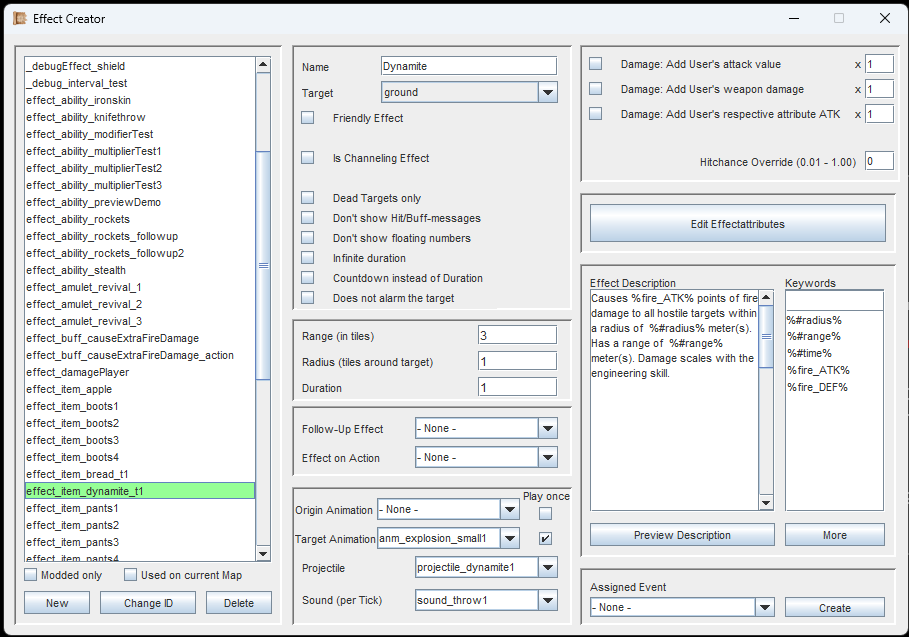
For the dynamite, we need to create an Effect. This determines what it actually does.
Since we are trying to make Dynamite in our example images, we need an Effect that has a Projectile (the dynamite) and the Effectattributes for the damage it does.
In this case, the target type 'Ground' was selected, with a radius of 1. This means, once the player uses the Dynamite in their inventory, they can manually aim at the ground and cause everything in the radius of 1 tile to be affected.
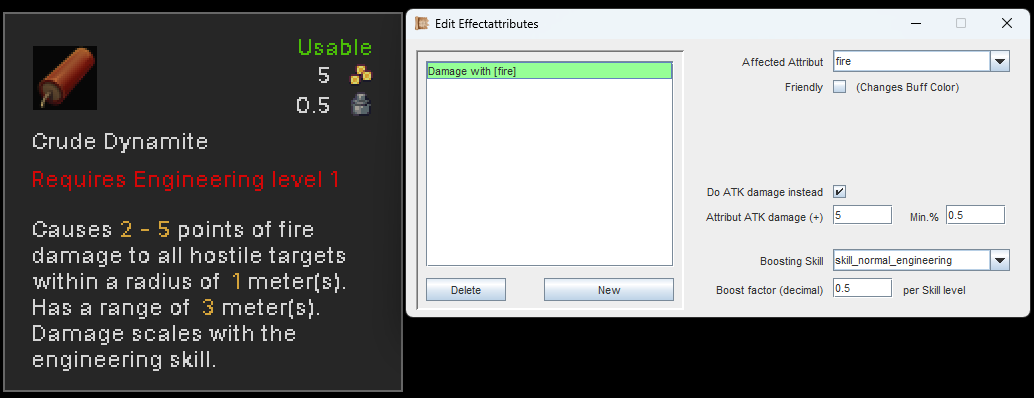
The Engineering Skill will influence the damage output of this Item. If this applies in-game, the numbers will appear in green.
The dynamite we make will cause fire damage, and this damage will scale with the user's engineering Skill, adding 0.5 damage per skill level. As always, all changes can be made while the Preview is active.
Crafting Recipes
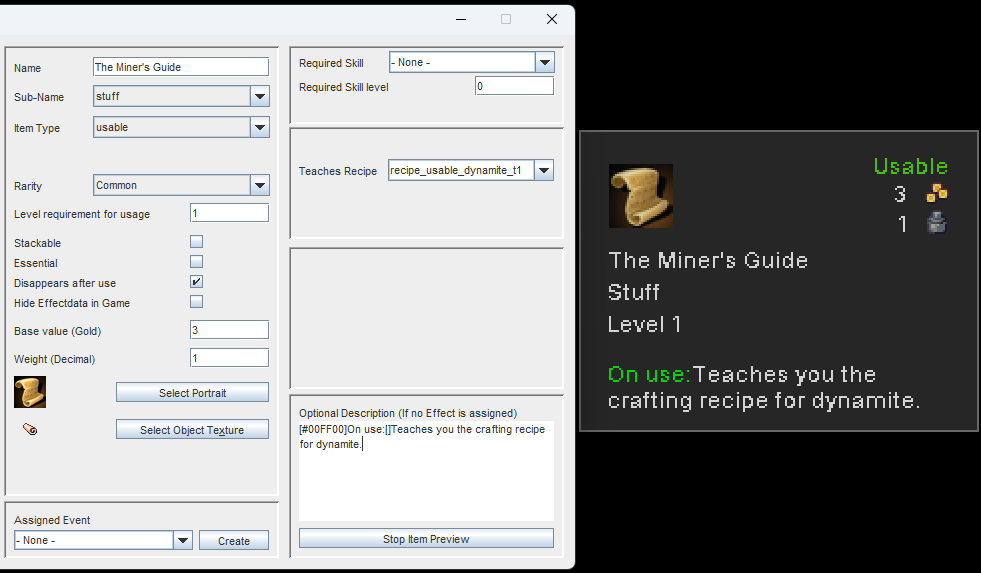
A simple, usable item that teaches a crafting recipe. The description even makes use of some manual color coding.
Usable Items can teach the player a crafting recipe when used. To do this, simply select a recipe in the dropdown.
Since no Effect is attached (and not needed), the description can come directly from the Item.
The item will not automatically disappear once the recipe has been learned. If you want to achieve this, the checkbox 'Disappears after Use' is needed.
Placing Items in the Map Editor
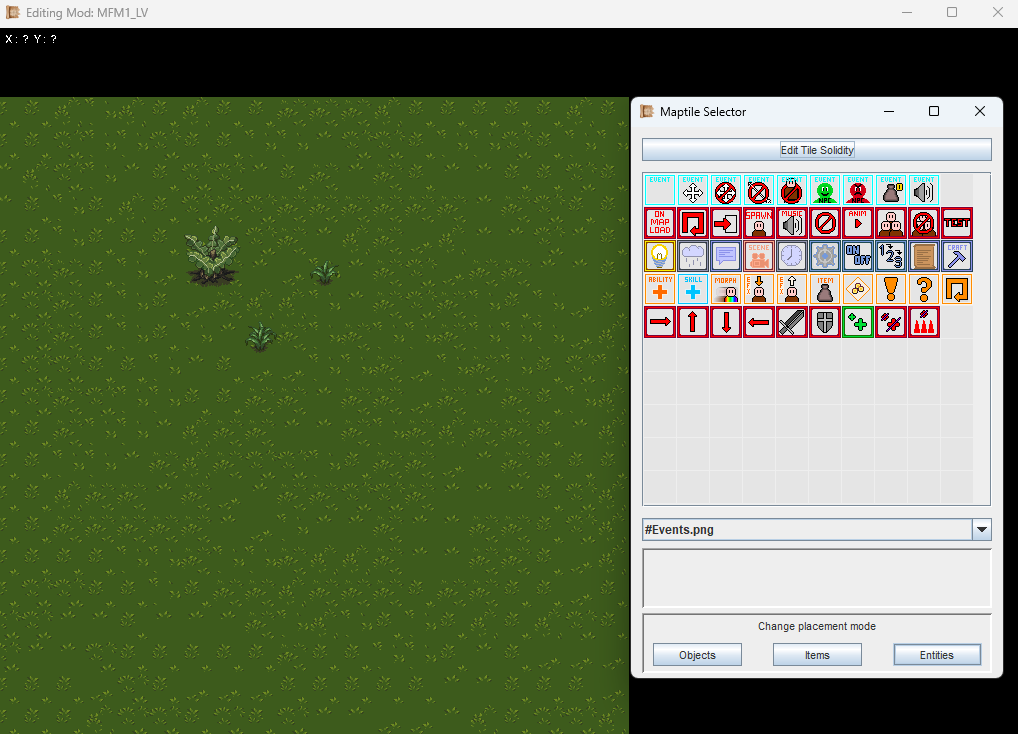
Select the Placement Mode 'Items'.
As promised in the Map Editor Page, we now return to the Map Editor with our new knowledge about Items.
Here, we learn how Items are placed (Spoiler: It's easy).
In the Map Tools, simply change the Placement Mode to 'Items'.
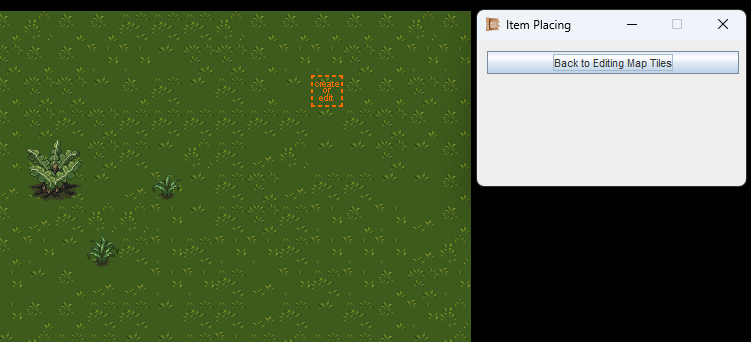
Click on any tile you want to add an Item to, or edit an existing Item on that tile.
Click on a tile to add a new Item.
If there is already an Item there, you will edit it instead.
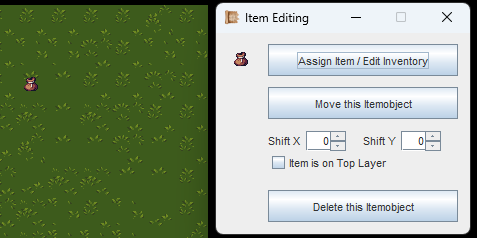
Time to add actual Items to the empty pouch.
Once your Item has been placed, it is basically a generic, empty pouch at first.
Go ahead and 'Assign Item/Edit Inventory'.
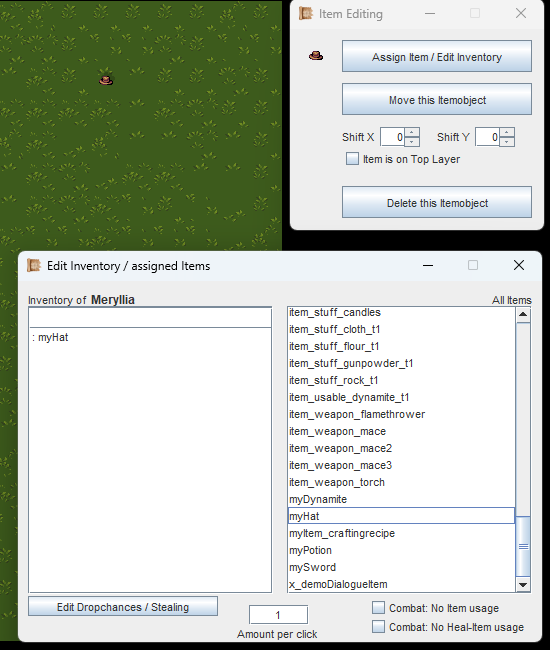
Click on the items you want to add.
In this view, just click on the Item(s) you want to have in the item pouch. You can also adjust their dropchance as needed.
If you only added a single item (or a single stack, if stackable), the item's own texture will appear. If more items are added, it will become a pile again.
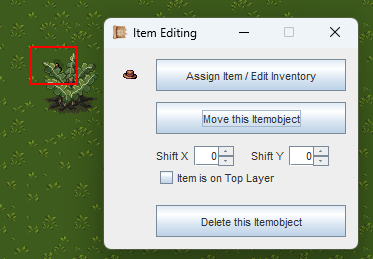
The top of the plant is a Top-Layer Maptile that can be passed underneath. So the item appears under the plant.
If you place an Item on a Top-Layer Maptile (like the top of the plant, which can be walked through underneath), your Item will be hidden behind it.
You can use this to your advantage, hiding Items for the player to find.
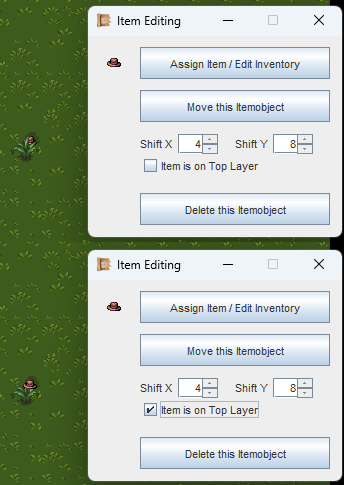
The upper image demonstrates pixel shifting. The hat is still hard to see because it its behind the plant though. To put it above the plant, it must be on the Top Layer.
Using the 'Shift X' and 'Shift Y' values, you can move the Item around pixel by pixel. This is good for fine adjustments, placing the Item just where you want it.
Lastly, it is possible to have an Item appear on top of Maptiles that would hide it. Simply activate the checkbox for displaying the Item on the Top Layer.
Shortcuts for Item Placement
While in 'Item-Placement-Mode', you can
- Right-Click on an existing Item to go into Copy&Paste mode.
- Hold the Deletion (Del) key on your keyboard and left-click an existing Item to quickly delete it (or multiple).
If you are following the Guide, continue with Entities.