The Editor
Entities
Reminder: Hover your mouse over almost any input, field, selectionbox or button in the Editor to receive tooltips and examples.
Table of contents
The Entity Creator
In the context of Adventures of Conquest and the Editor, an Entity is a player character, NPC or destructible object. So, inside of the Editor, in the Entity Creator, you can create NPCs and destructible objects. Every Entity you create in here can be placed on a Map multiple times.
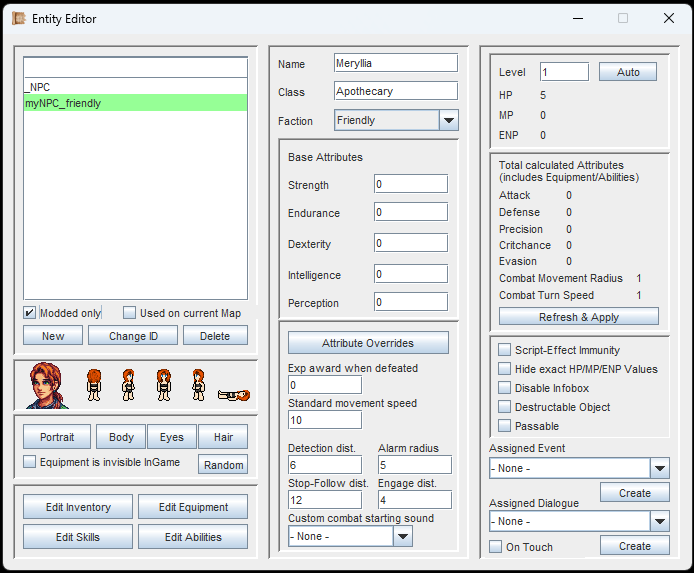
Most of these settings speak for themselves, but all of them are tooltipped if you want to know what they do quickly.
Creating an Entity is as simple as clicking the 'New'-Button and assigning it a unique ID. From there on, a lot of the settings you see should remind you of the in-game character creation.
NPCs will need a name, a class and a faction. The faction simply determines if they are friendly or hostile towards the player.
For hostile NPCs and (destructible objects) you have to give them attributes, items, equipment, abilities etc. to make them interesting.
Friendly NPCs don't need all of these. For them its mostly equipment for looks.
Textures: Portrait, Body, Eyes & Hair
Portrait Texture
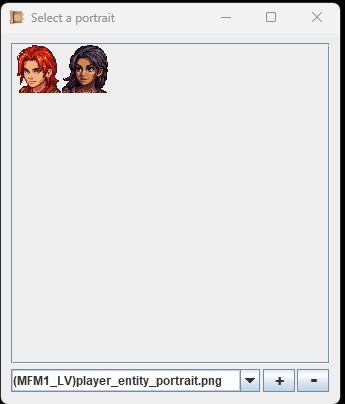
Pressing the + and - buttons will zoom in and out.
Click on the 'Portrait'-button to select a portrait for your NPC. For destructible objects you don't need a portrait, but we get to that later.
If you have custom portraits in your '...mods/[YourMod]/gfx/entity_portrait' folder, you can select them in the dropdown.
If a portrait, or set of portraits, has the prefix 'player_' in it, they will be available for the player to choose during character creation. You can also select them in the Editor for any NPCs, but I don't recommend doing so, to keep the players unique.
Body Texture
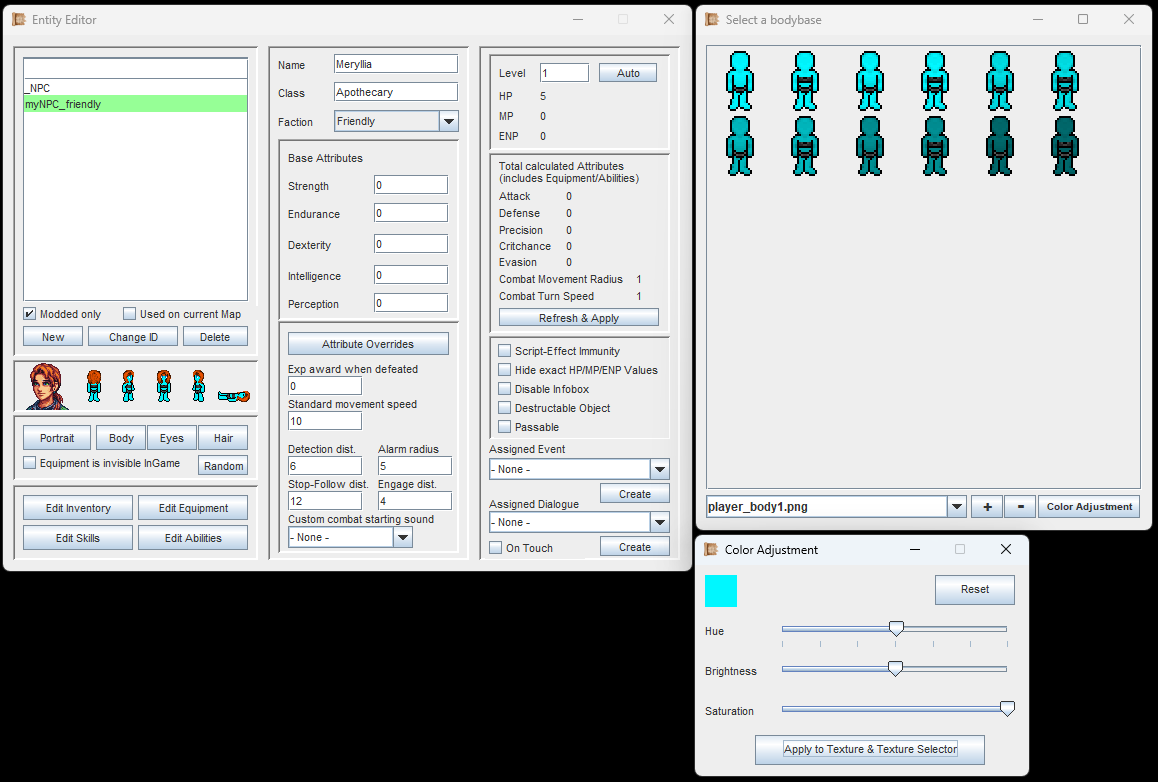
Color Adjustment is a neat feature that helps to add more variation while saving texture space.
Click on the 'Body'-button to select a body for your NPC or destructible object.
If you have custom body sets in your '...mods/[YourMod]/gfx/entity_body' folder, you can select them in the dropdown.
If you press the 'Color Adjustment'-button, you can change Hue, Brightness and Saturation of all textures in your preview. Super handy to save space, as you don't have to create new textures for every color variation.
If a body, or set of bodies, has the prefix 'player_' in it, they will be available for the player to choose during character creation.
Hair & Eye Textures
These work exactly the same as the Body Texture. You can use your custom version if you have textures in your
'...mods/[YourMod]/gfx/entity_hair' or '...mods/[YourMod]/gfx/entity_eyes' folders respectively.
As with the Body Texture, you can also make use of 'Color Adjustment', which is especially important in the cases of Eyes and Hair.
Appearance Randomizer Tool
Clicking on the 'Random'-button will open the Randomizer Tool window. Here you can randomize your Entities' appearance within certain parameters, and see your results in real-time.
The various checkboxes show what part of the Entity you want to randomize. Unchecking all the boxes except "Hair" would only randomize the hair, while keeping the color as-is.
When randomizing Body, Eyes, Hair and the Portrait you have the option to only randomize within a selected texture set.
'Allow Player-Textures' will include all texture sets that have the prefix 'player_' in them. This is usually used to tell the game which textures the player can use during the in-game character creation.
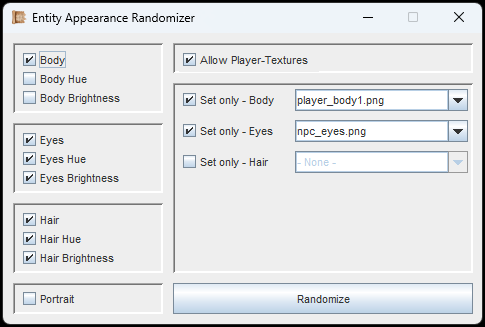
The Randomizer Tool allows for quick creation of NPC appearances. Good if you have a lot of background NPCs.
Skills, Abilities, Items & Equipment
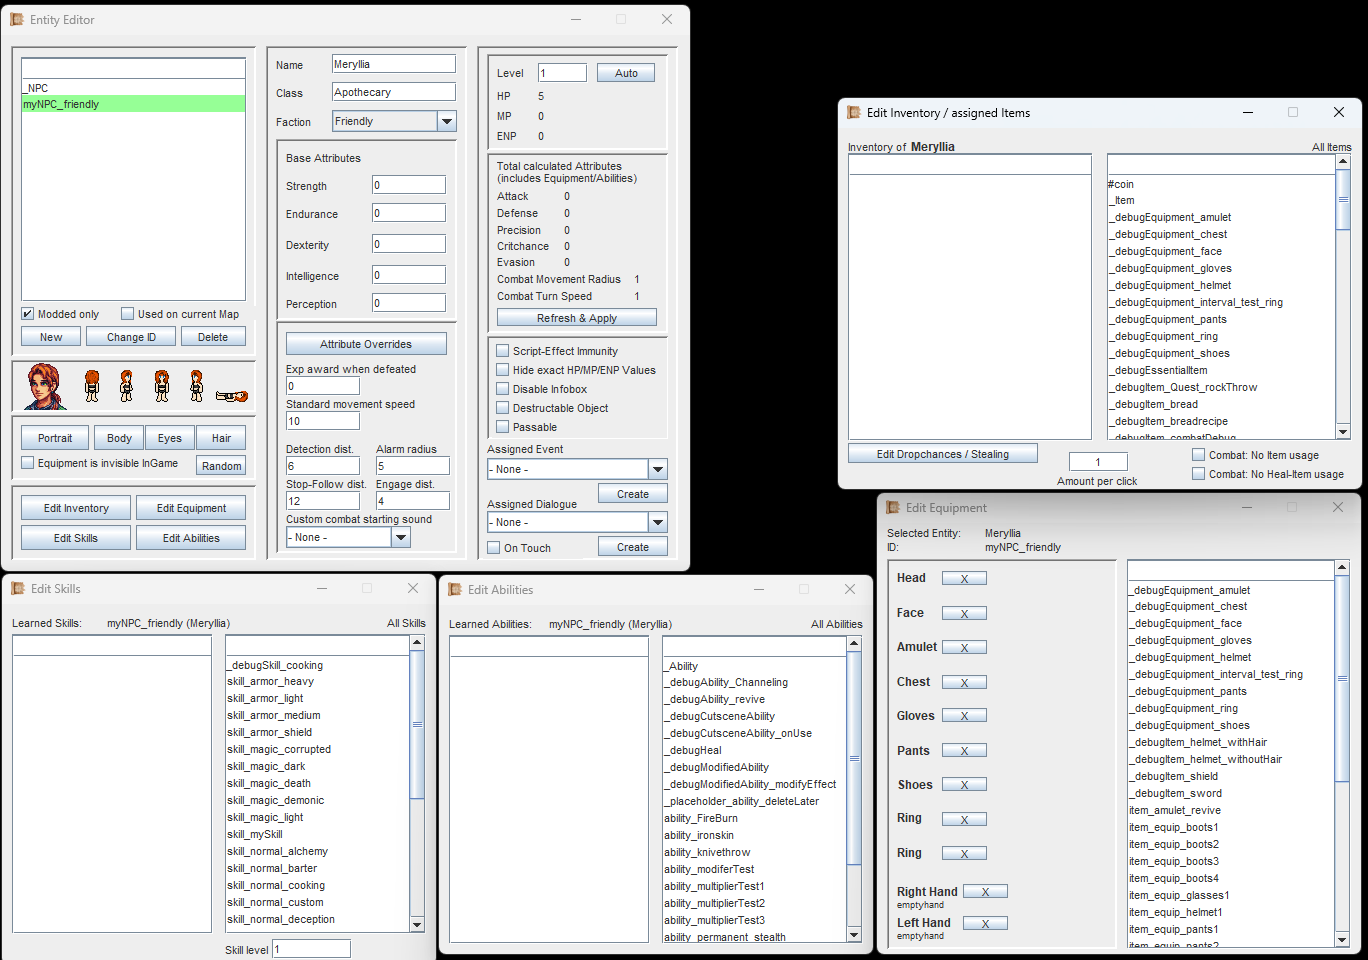
Every Entity can be assigned Skills, Abilities, Items and Equipment.
With just a few clicks, you can add Skills, Abilities, Items & Equipment to the NPC. Here is a quick explanation which ones are necessary for what purpose.
Skills
Hostile NPCs don't need Skills to use Abilities. If the Ability scales with a Skill, the hostile NPC will benefit from it though.
Friendly NPCs only need Skills when they are supposed to be a teacher (this will be explained when we get to EventBits). They can teach all the Skills that they know themselves.
Abilities
Hostile NPCs will use Abilities in Combat. They will respect Mana, Energy and Cooldowns, but they will ignore Skill-requirements.
Friendly NPCs only need Abilities when they are supposed to be a teacher (this will be explained when we get to EventBits). They can teach all the Abilities that they know themselves.
Items
Hostile NPCs can make use of consumable and usable Items, like e.g. health potions and throwable dynamite. On death, they will drop their items and the player can loot them. More about this in the next section below.
Friendly NPCs can be stolen from with a 'Stealing'-Ability. Other than that, they don't need items.
Equipment
Hostile NPCs benefit from the attributes and passive Effects. Also, they won't look naked. Equipment does not drop on death.
Friendly NPCs mostly need them for visuals. They also get the Effects, but since they don't fight, the Effects are unnecessary.
The Preview always shows all 5 visual states an Entity can be in.
When adding Equipment, you can preview how it will look like in the Entity Creator.
Items & The Loot Table
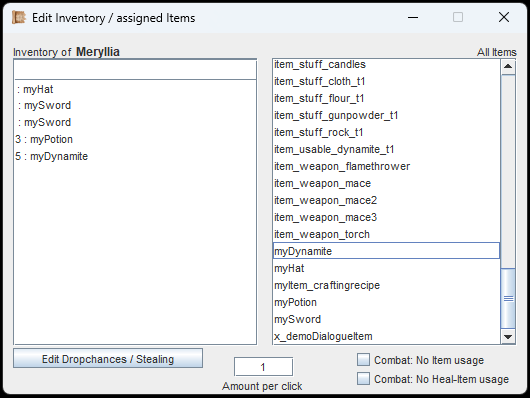
Stackable Items will appear with a number in front. Non-stackable Items will appear multiple times.
When adding Items to an NPC (usually a hostile one), then you can make some additional adjustments.
At the bottom right of the window you can change their item use behavior.
If you give a bandit a health potion and a stick of dynamite, they will use them in Combat. However, if you want to restrict this, then activate the checkboxes.
Every item that the (hostile) NPC didn't use or consume will be dropped on their death.
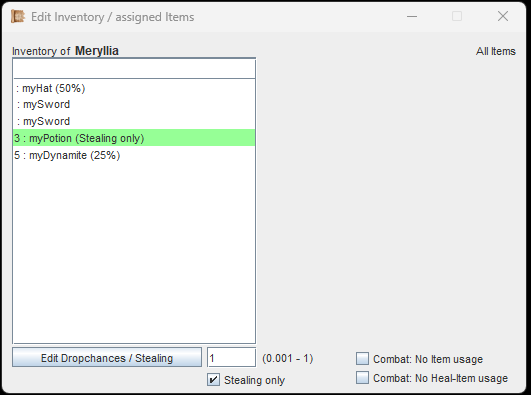
Marking an Item (or stack) as 'Stealing only' means that it can't be looted, only stolen. Hostile Entities can still use it during Combat, if permitted.
After you have placed Items in the NPCs inventory, you can click on the 'Edit Dropchances/Stealing"-Button.
Let's talk about the Dropchance first.
Select an Item (or stack) and then adjust the decimal value at the bottom of the window. This represents a percentage. 1 (default) = 100% chance to drop. 0.5 = 50% chance to drop.
If the NPC has dynamite, they will always be able to use it during combat (if allowed), but if the dropchance is low, they might not drop it. Want them to throw dynamite but never drop it? Use an Ability with the exact same Effect instead.
Let's talk about Stealing then.
Through the use of EventBits (we come to them later) you can create various Stealing-Abilities. One stealing attempt will take 1 item from the NPCs inventory (or a random amount if its a stack).
You can steal from hostile and friendly NPCs alike.
But, only Items that are marked as 'Stealable' can be stolen. And those Items can only be stolen, not looted. A hostile Entity can still make use of them during Combat though.
Attributes & Overrides
Attributes
Primary attributes work exactly the same as for player characters.
For hostile NPCs and destructible objects you should assign some primary attributes, as these will determine their secondary ones, like 'Attack', 'HP' or 'Precision'.
You will see the calculations to the right, just hit the 'Refresh'-Button.
At the top-right you will see the NPCs HP, MP and ENP (Health, Mana, Energy) and their level. The level can be manually assigned by you, or automatically calculated according to the number of attribute points you assigned.
However, if you want to fine-tune the NPC even more, this is possible with the Attribute Overrides.
Attribute Overrides
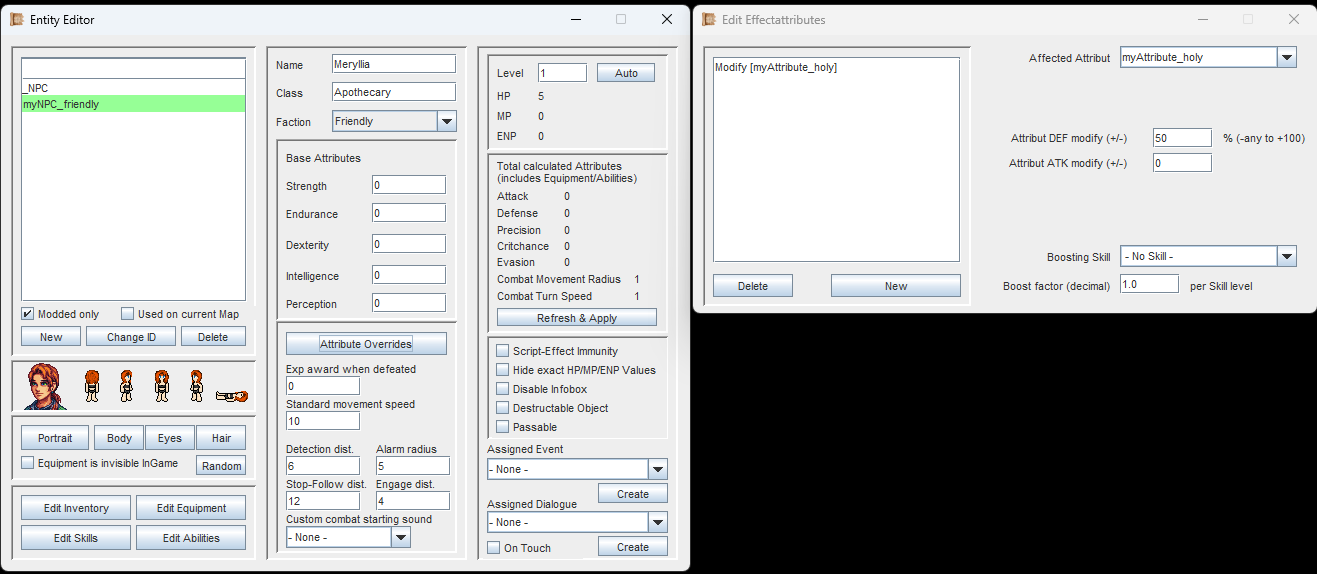
With 'Attribute Overrides' you can assign any attribute you want to the NPC.
Click on the 'Attribute Override'-Button. The Window that appears is quite similar to the one when creating Effects.
Here, you can add any attribute and specify a value. This includes absolutely all attributes.
Want to make an NPC resistant to fire? Add the fire attribute and raise the DEF value to 100%.
Want to make an NPC have exactly 1 HP instead of the default 5? Add the '#maximum_HP' attribute and set it to -4.
Combat Settings
Combat related settings are only relevant for hostile NPCs, except for the standard movement speed.
For hostile NPCs, you should take a look at the combat settings at the bottom of the window. Here is what they do:
Exp award when defeated
The amount of experience every player character gets when this Entity is defeated. Every player character receives this amount, unless they are unconscious.
Standard movement speed
How fast the Entity moves outside of combat, e.g. when chasing the player. 10 is the same value as the player has by default.
Detection dist.
How many tiles they can see in the direction they are facing (length of their view). The width of their view is always 3 tiles. Also, they will notice you if you stand directly to their left or right side. They will not notice you if you stand behind them.
Alarm radius
When the hostile Entity detects a player character, they will immediately cause all other hostile Entities within this radius to also chase the player. The Alarm is vocal and does not go through walls (though if the wall is short, it can go around, just like light). An Alarm will not cause a chain reaction of Alarms.
Stop-Follow dist.
This is the distance in tiles that the player must be away from the hostile NPC in order for them to stop chasing the player.
Engage dist.
Once the hostile NPC is within this distance in tiles, Combat will start.
Custom combat starting sound
If specified here, the sound when starting combat will be different. If multiple hostiles with custom starting sounds enter combat, then the sound of the hostile with the highest level will be played.
Special Settings, Dialogue & Events
The special flags on the bottom-right side modify the Entities' behavior.
On the bottom-right side of the window you will find a few additional checkboxes, an Event- and Dialogue dropdown field.
Script-Effect Immunity
This is a simple flag that can be checked against in Events. Some special Abilities, may have scripted logic behind them. And if these check for this flag, they can choose to not affect the Entity.
Hide exact HP/MP/ENP values
When hovering a hostile NPC with the mouse, they will not show their health, mana or energy. Instead, question marks are displayed.
Disable Infobox
When hovering a hostile NPC with the mouse, no infobox will appear.
Destructable Object
A hostile NPC with this flag will behave more like an object. It will not detect or chase the player, not alarm anyone, but it can still receive damage and drop its inventory as loot. The infobox will only contain its name, and nothing else. Destroying it can award EXP, but this won't be visibly shown.
Passable
When active, the Entity has no collision. Every other Entity (including the player) can pass through them. This can be used to create e.g. landmines that can be stepped on, paired with an 'on_touch'-Event.
Assigned Event
An 'Entity-type'-Event can be assigned here. More on that on Events.
Assigned Dialogue
A dialogue can be assigned here. When interacting with the Entity, this dialogue will be played. Can also be on touch, if selected. When both an Event and a Dialogue are assigned, the Event will always execute first.
Placing Entities on the Map
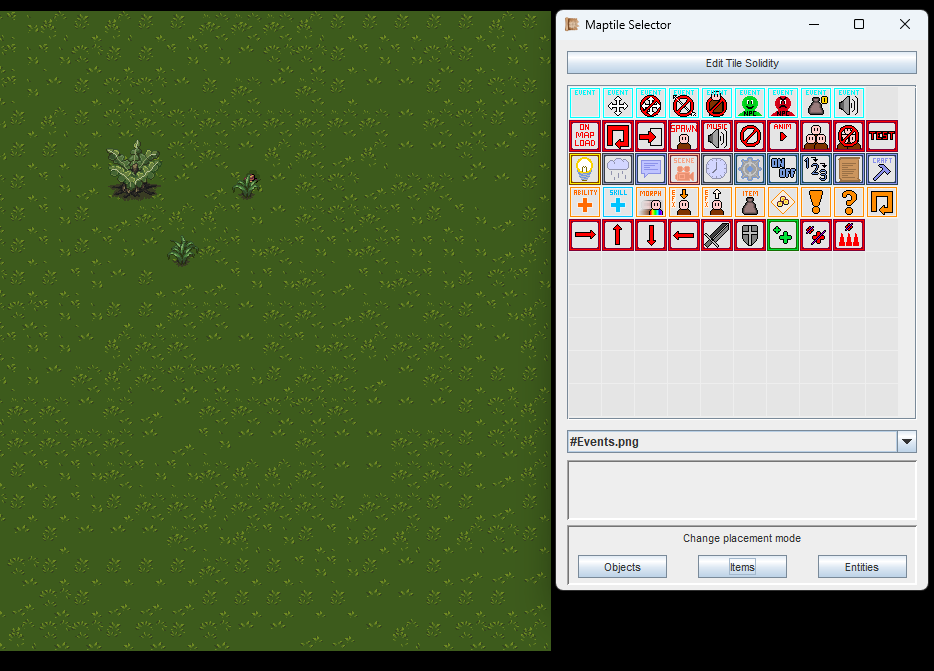
In the Map Tools, click the Button 'Entities' inside the Maptile Selector.
Once again, we return to the Map Editor, this time to learn how to place Entities. In the Maptile Selector, simply click the 'Entities'-Button at the bottom of the window.
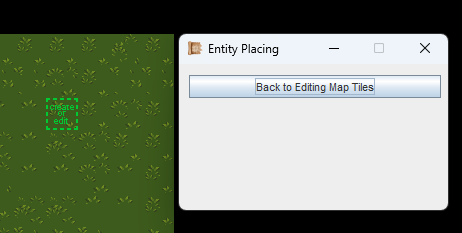
If you click on a tile without an Entity, you create a new one. If you click on an existing one, you will edit it.
As with Items, your cursor will change, and you can left-click on the Map to place down an Entity.
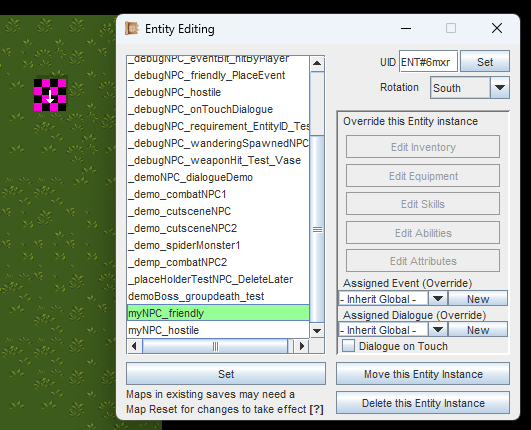
Select from the list of all Entities, then click the 'Set'-Button.
Once you placed the Entity, you will notice that it appears as a black-pink checker pattern with a directional arrow on top. This is because it has no actual data assigned yet - it is an empty Entity.
So, in the window that opens, select your Entity on the list, then click on the 'Set'-Button.
Empty Entities will not be saved, and won't appear in the game, so make sure you assign something with the Set-Button.
The 'UID' is a unique ID for each placed Entity. This can be used later to refer to them, when using Events.
Once you have assigned your Entity, you will immediately see the change.
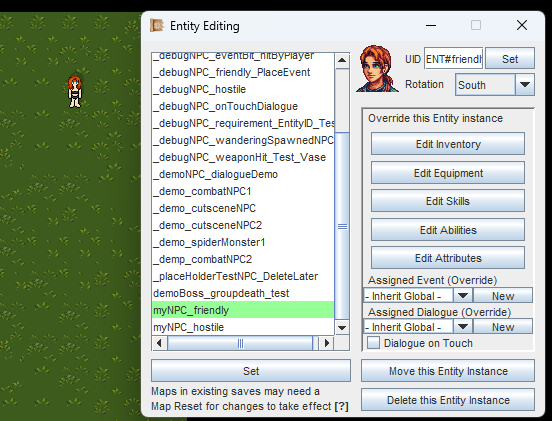
At the top-right, you can see a field for the UID (unique ID) of this Entity instance. Even if you place multiple Entities of the same type, each one will have a unique ID assigned. You can change it into something more readable if needed, then click 'Set'. Note: The 'ENT#'-prefix always stays. We will talk more about UIDs when we get to Events and EventBits.
Below that, you can find the Rotation. This is simple enough, just the 4 possible directions this Entity can face.
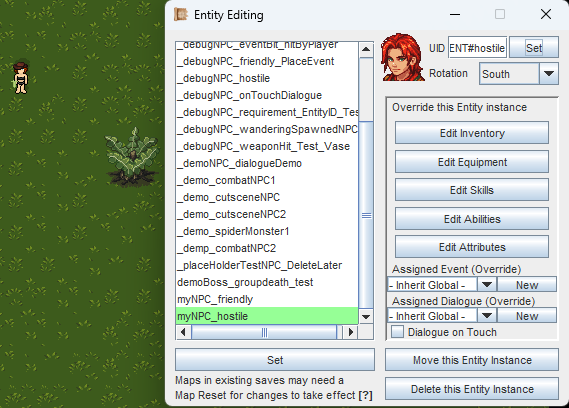
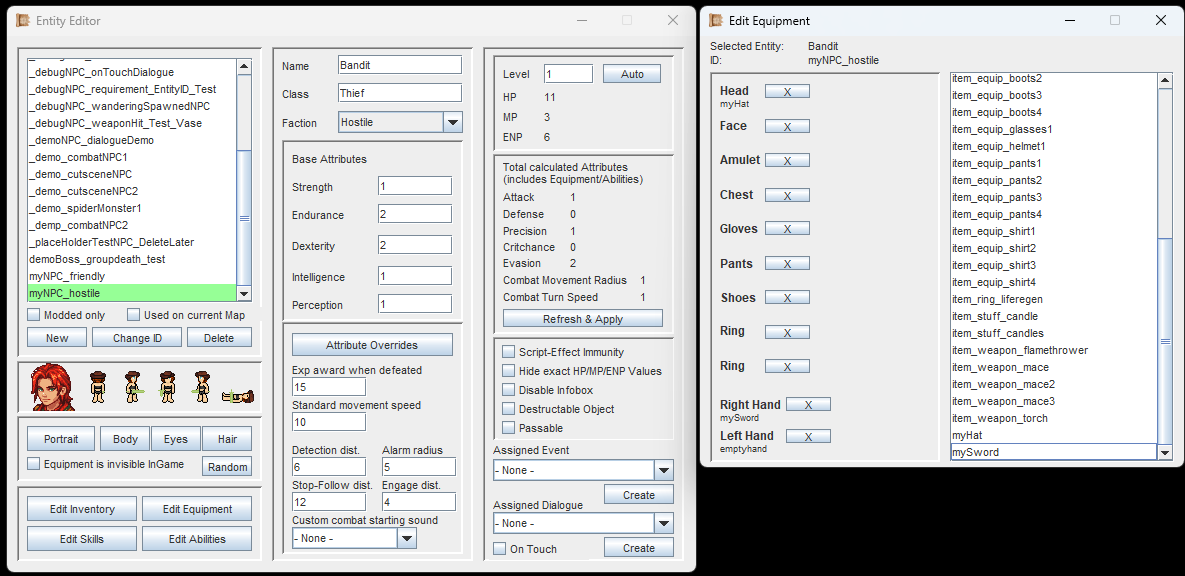
The Entity can always be changed. Here it was set to a hostile Entity now.
If you place down 5 instances of the same Entity (or copy-paste one by right-clicking it when in Entity-Placement-Mode), all of them naturally have the same stats.
However, you can override these in this menu. This is usually not necessary, but you do have this option.
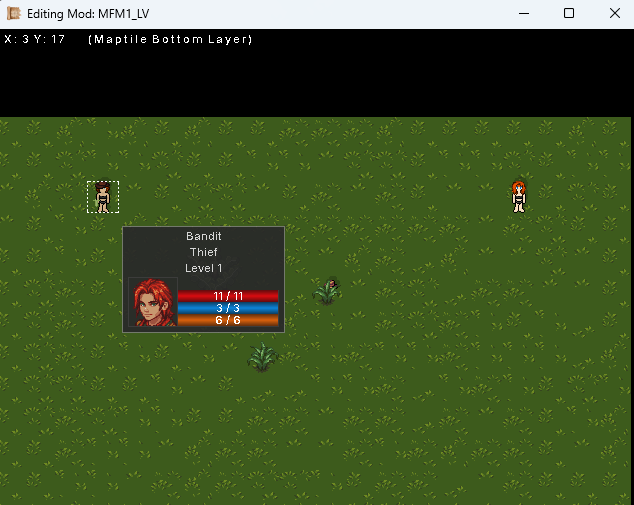
A hostile Entity on the left, the friendly Entity on the right. Hostile Entities usually show their HP/MP/ENP values, unless disabled.
In the render window, you can always hover your mouse over an Entity to preview their infobox.
Shortcuts for Entity Placement
While in 'Entity-Placement-Mode', you can
- Right-Click on an existing Entity to go into Copy&Paste mode.
- Hold Shift, then Right-click on an existing Entity to open it in the Entity Creator.
- Hold the Deletion (Del) key on your keyboard and left-click an existing Entity to quickly delete it (or multiple).
If you are following the Guide, continue with Crafting Recipes.